
Create a course
Create a course
NewRich allows creators to build and sell structured online courses using a guided five-step creation process.
Courses can be offered for free, sold as a one-time purchase, or purchased through a recurring subscription. Each course supports lessons, downloadable resources, free previews, and detailed course information to help learners understand what they'll gain before enrolling.
This guide walks you through every step of creating and publishing a course.
Where to Start
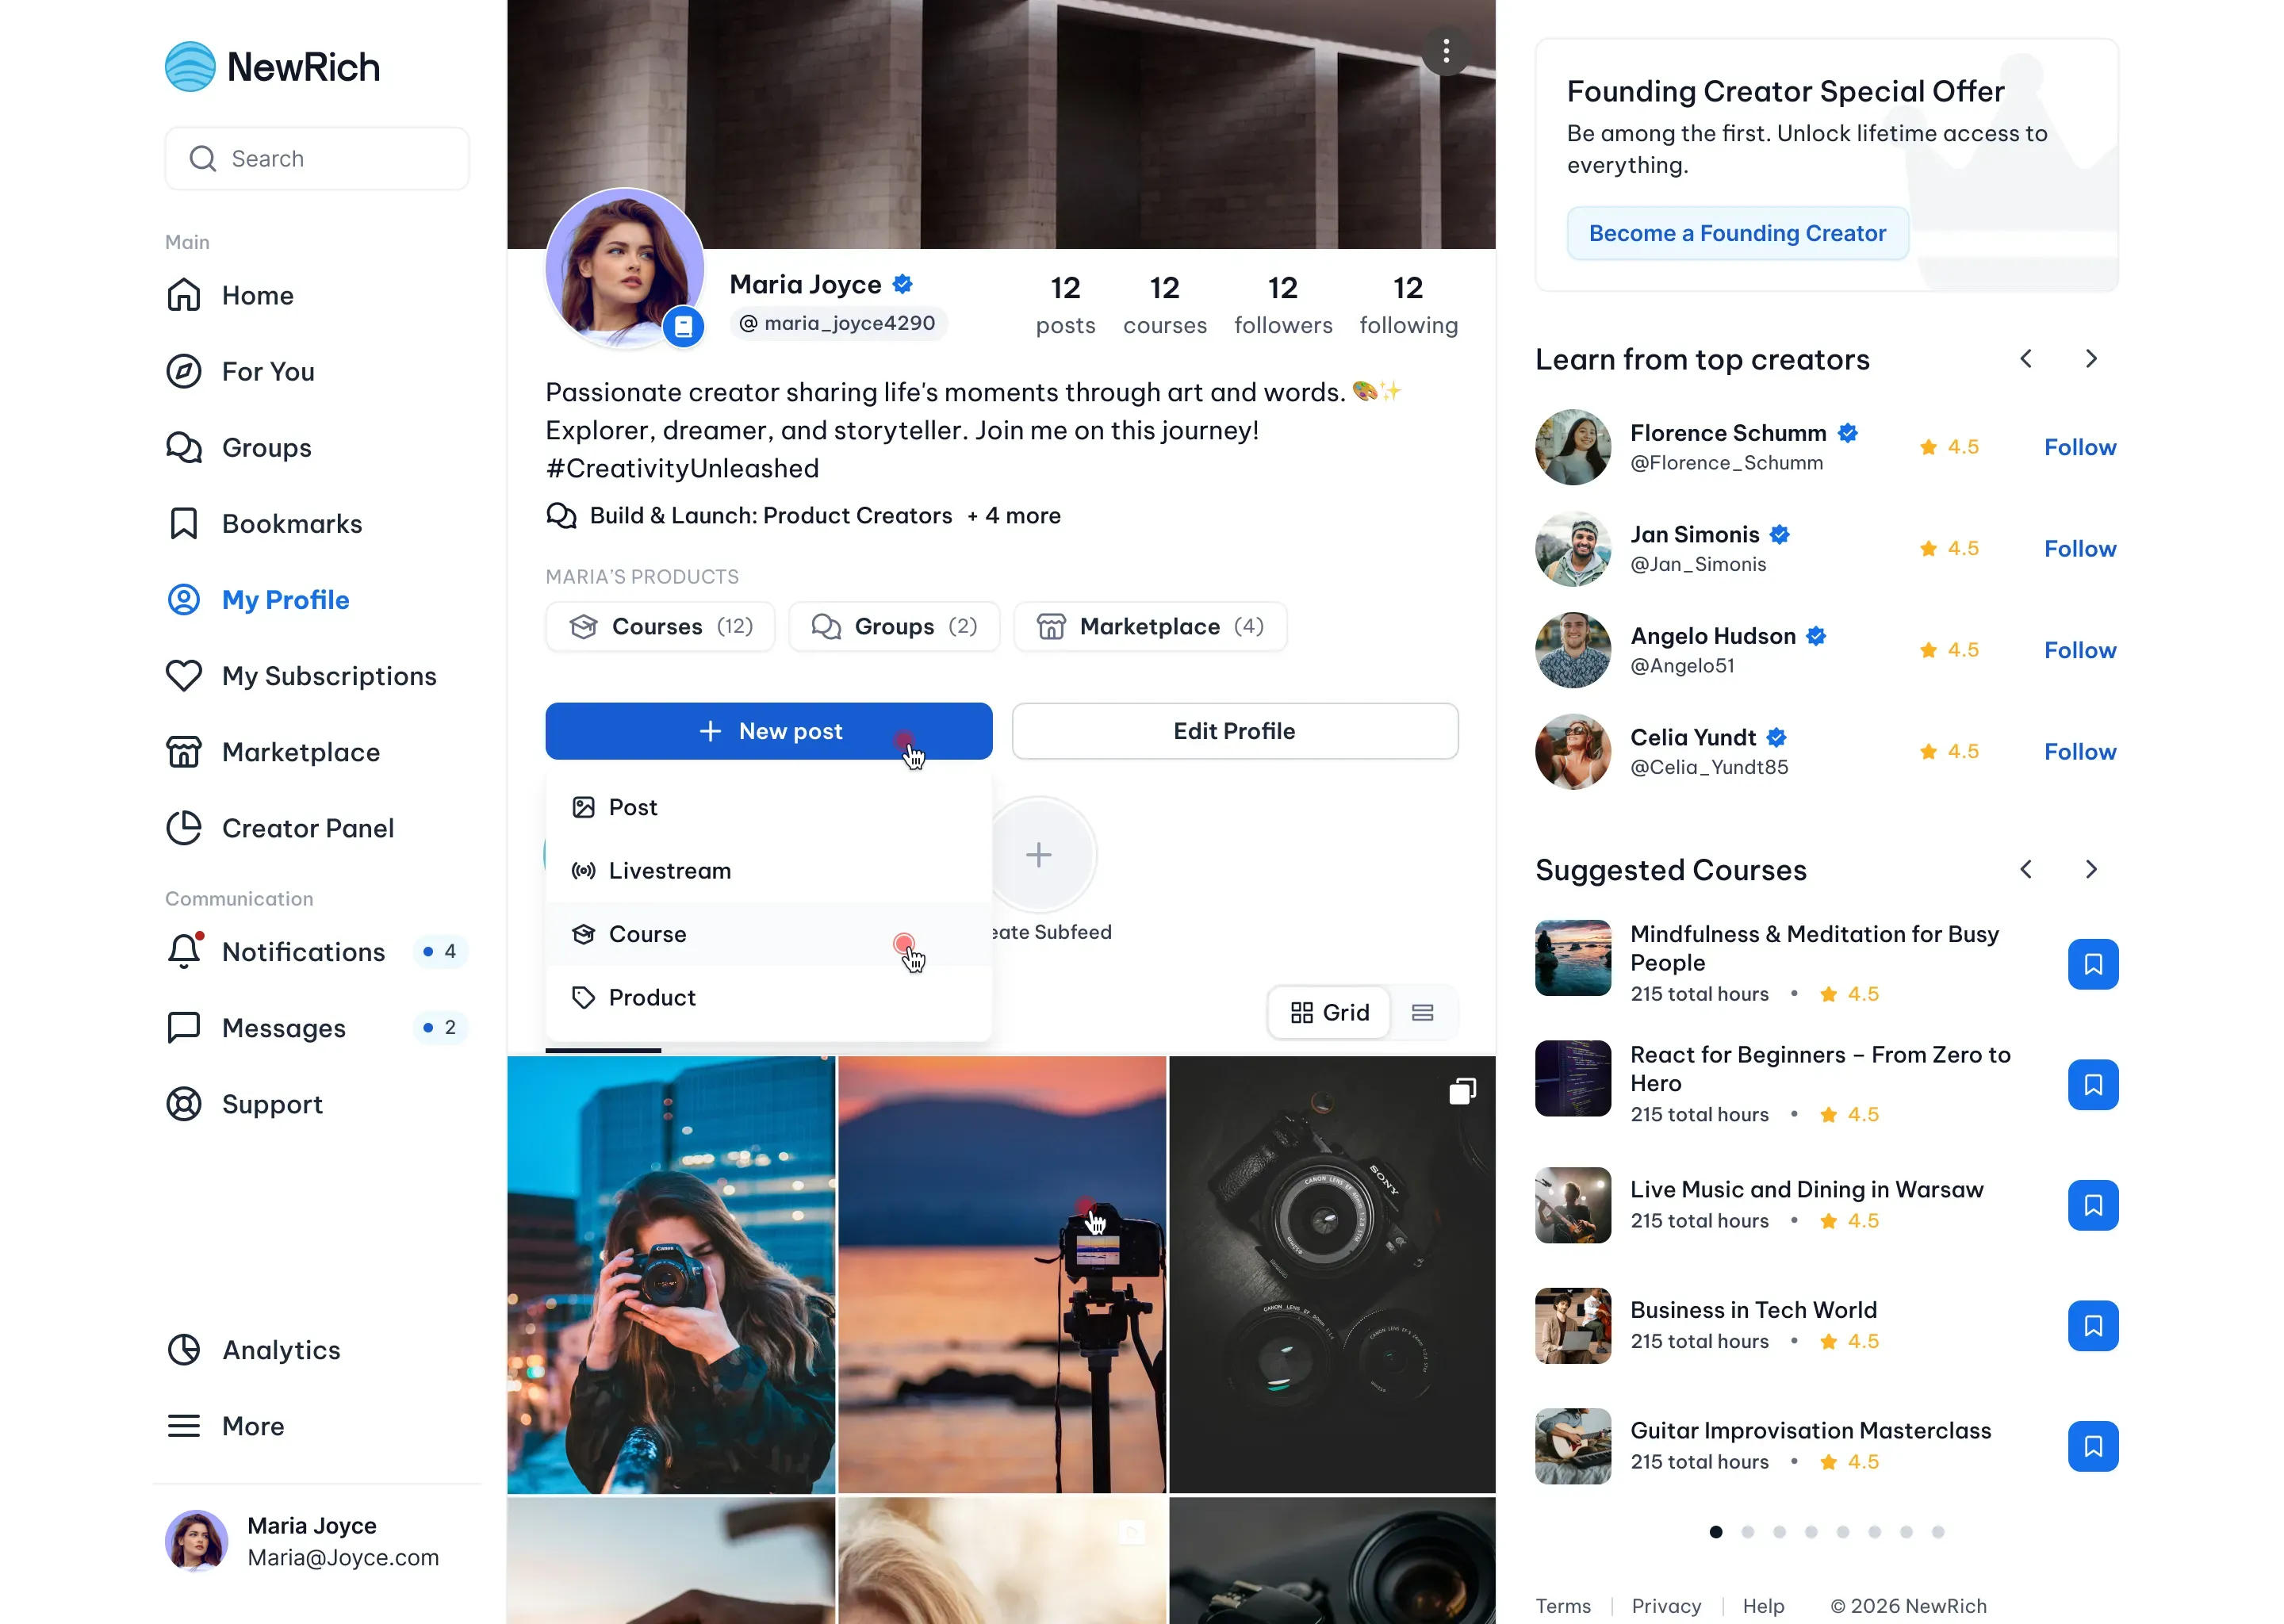
You can create a new course from two locations:
- Your Profile by clicking New Post → Course
- The Marketplace by clicking Submit a product → Course
Both options open the same Course Creation flow.
Course Creation Flow
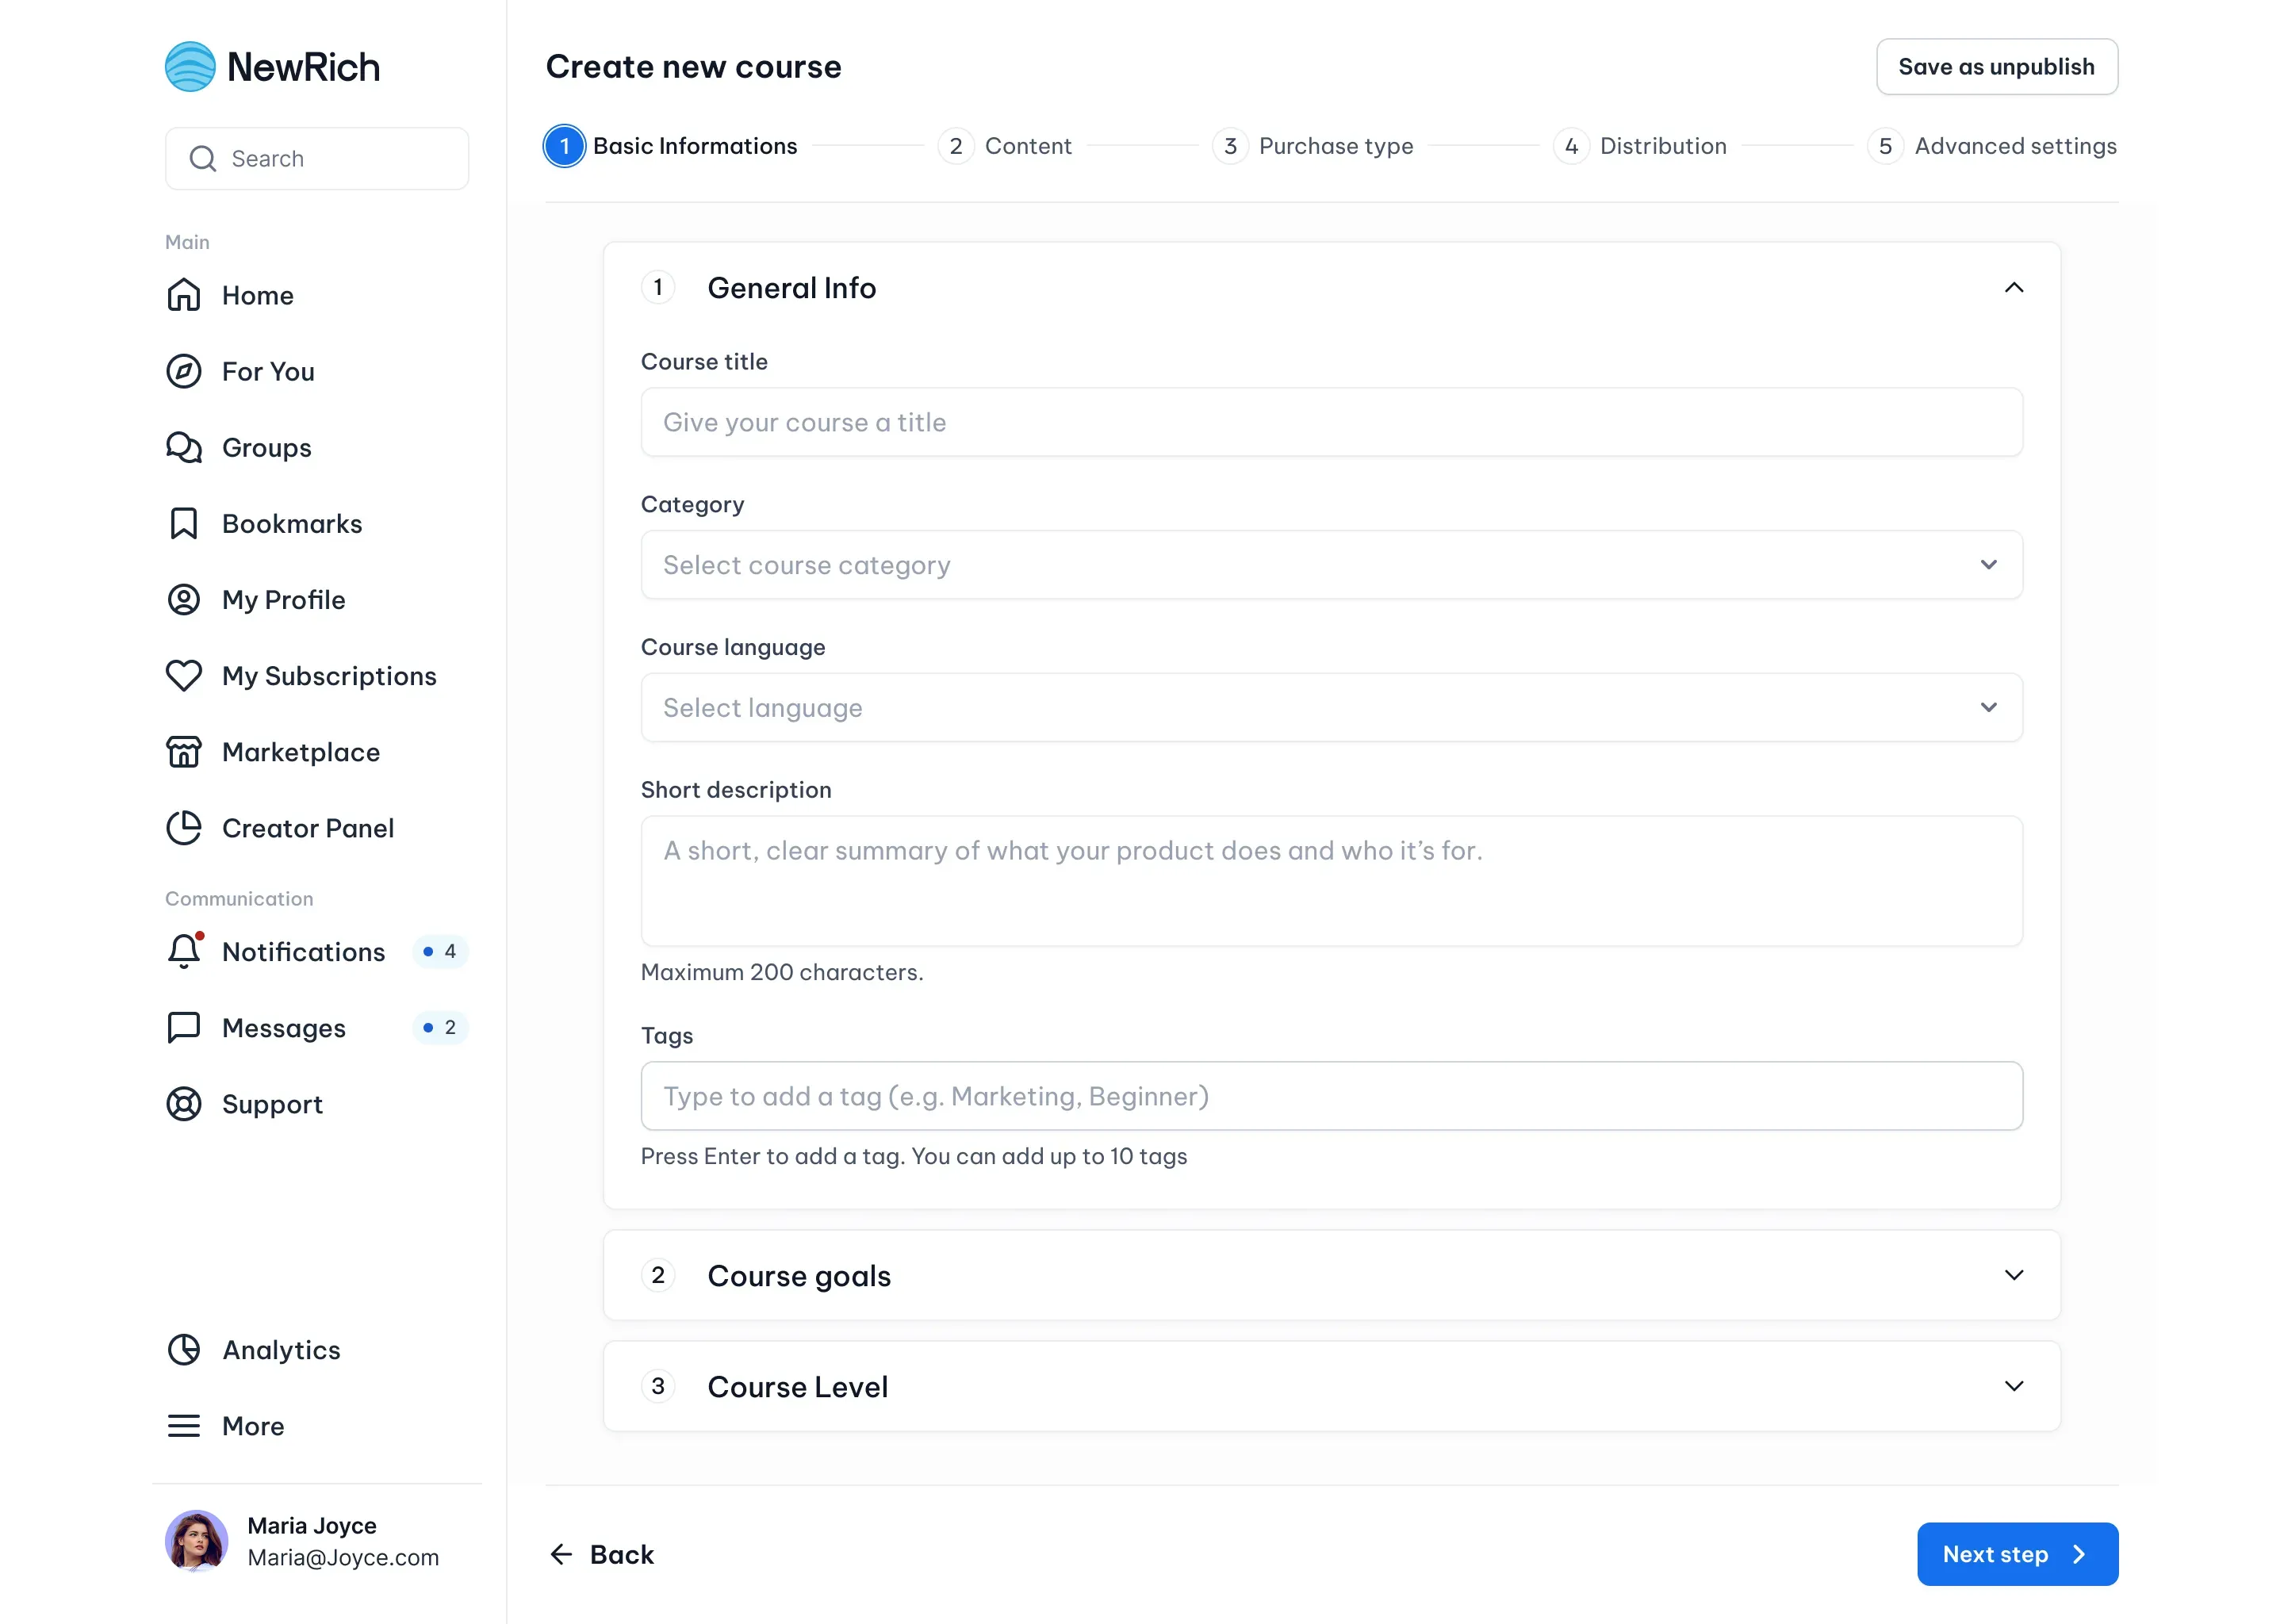
Creating a course consists of five guided steps:
- Basic Information
- Content
- Purchase Type
- Distribution
- Advanced Settings
Each step focuses on a different part of the course creation process, from entering basic information to configuring publishing settings.
Step 1 - Basic Information
The first step is where you'll enter the core details about your course.
This information helps learners understand what your course covers and who it's designed for before they enroll.
In this step, you'll provide:
- General Information:
- Course title
- Category
- Course language
- Short description
- Tags
- Course Goals:
- What learners will achieve
- Who the course is designed for
- Course Level: Select the difficulty level that best matches your course:
- Beginner
- Intermediate
- Advanced
- All Levels Choosing the correct level helps learners find courses that match their experience.
Complete the following information:
- Enter your course title.
- Choose a category.
- Select the course language.
- Write a short description.
- Add relevant tags.
- Describe your learning goals.
- Explain who the course is for.
- Select the appropriate course level.
- Click Next step.
Step 2 - Content
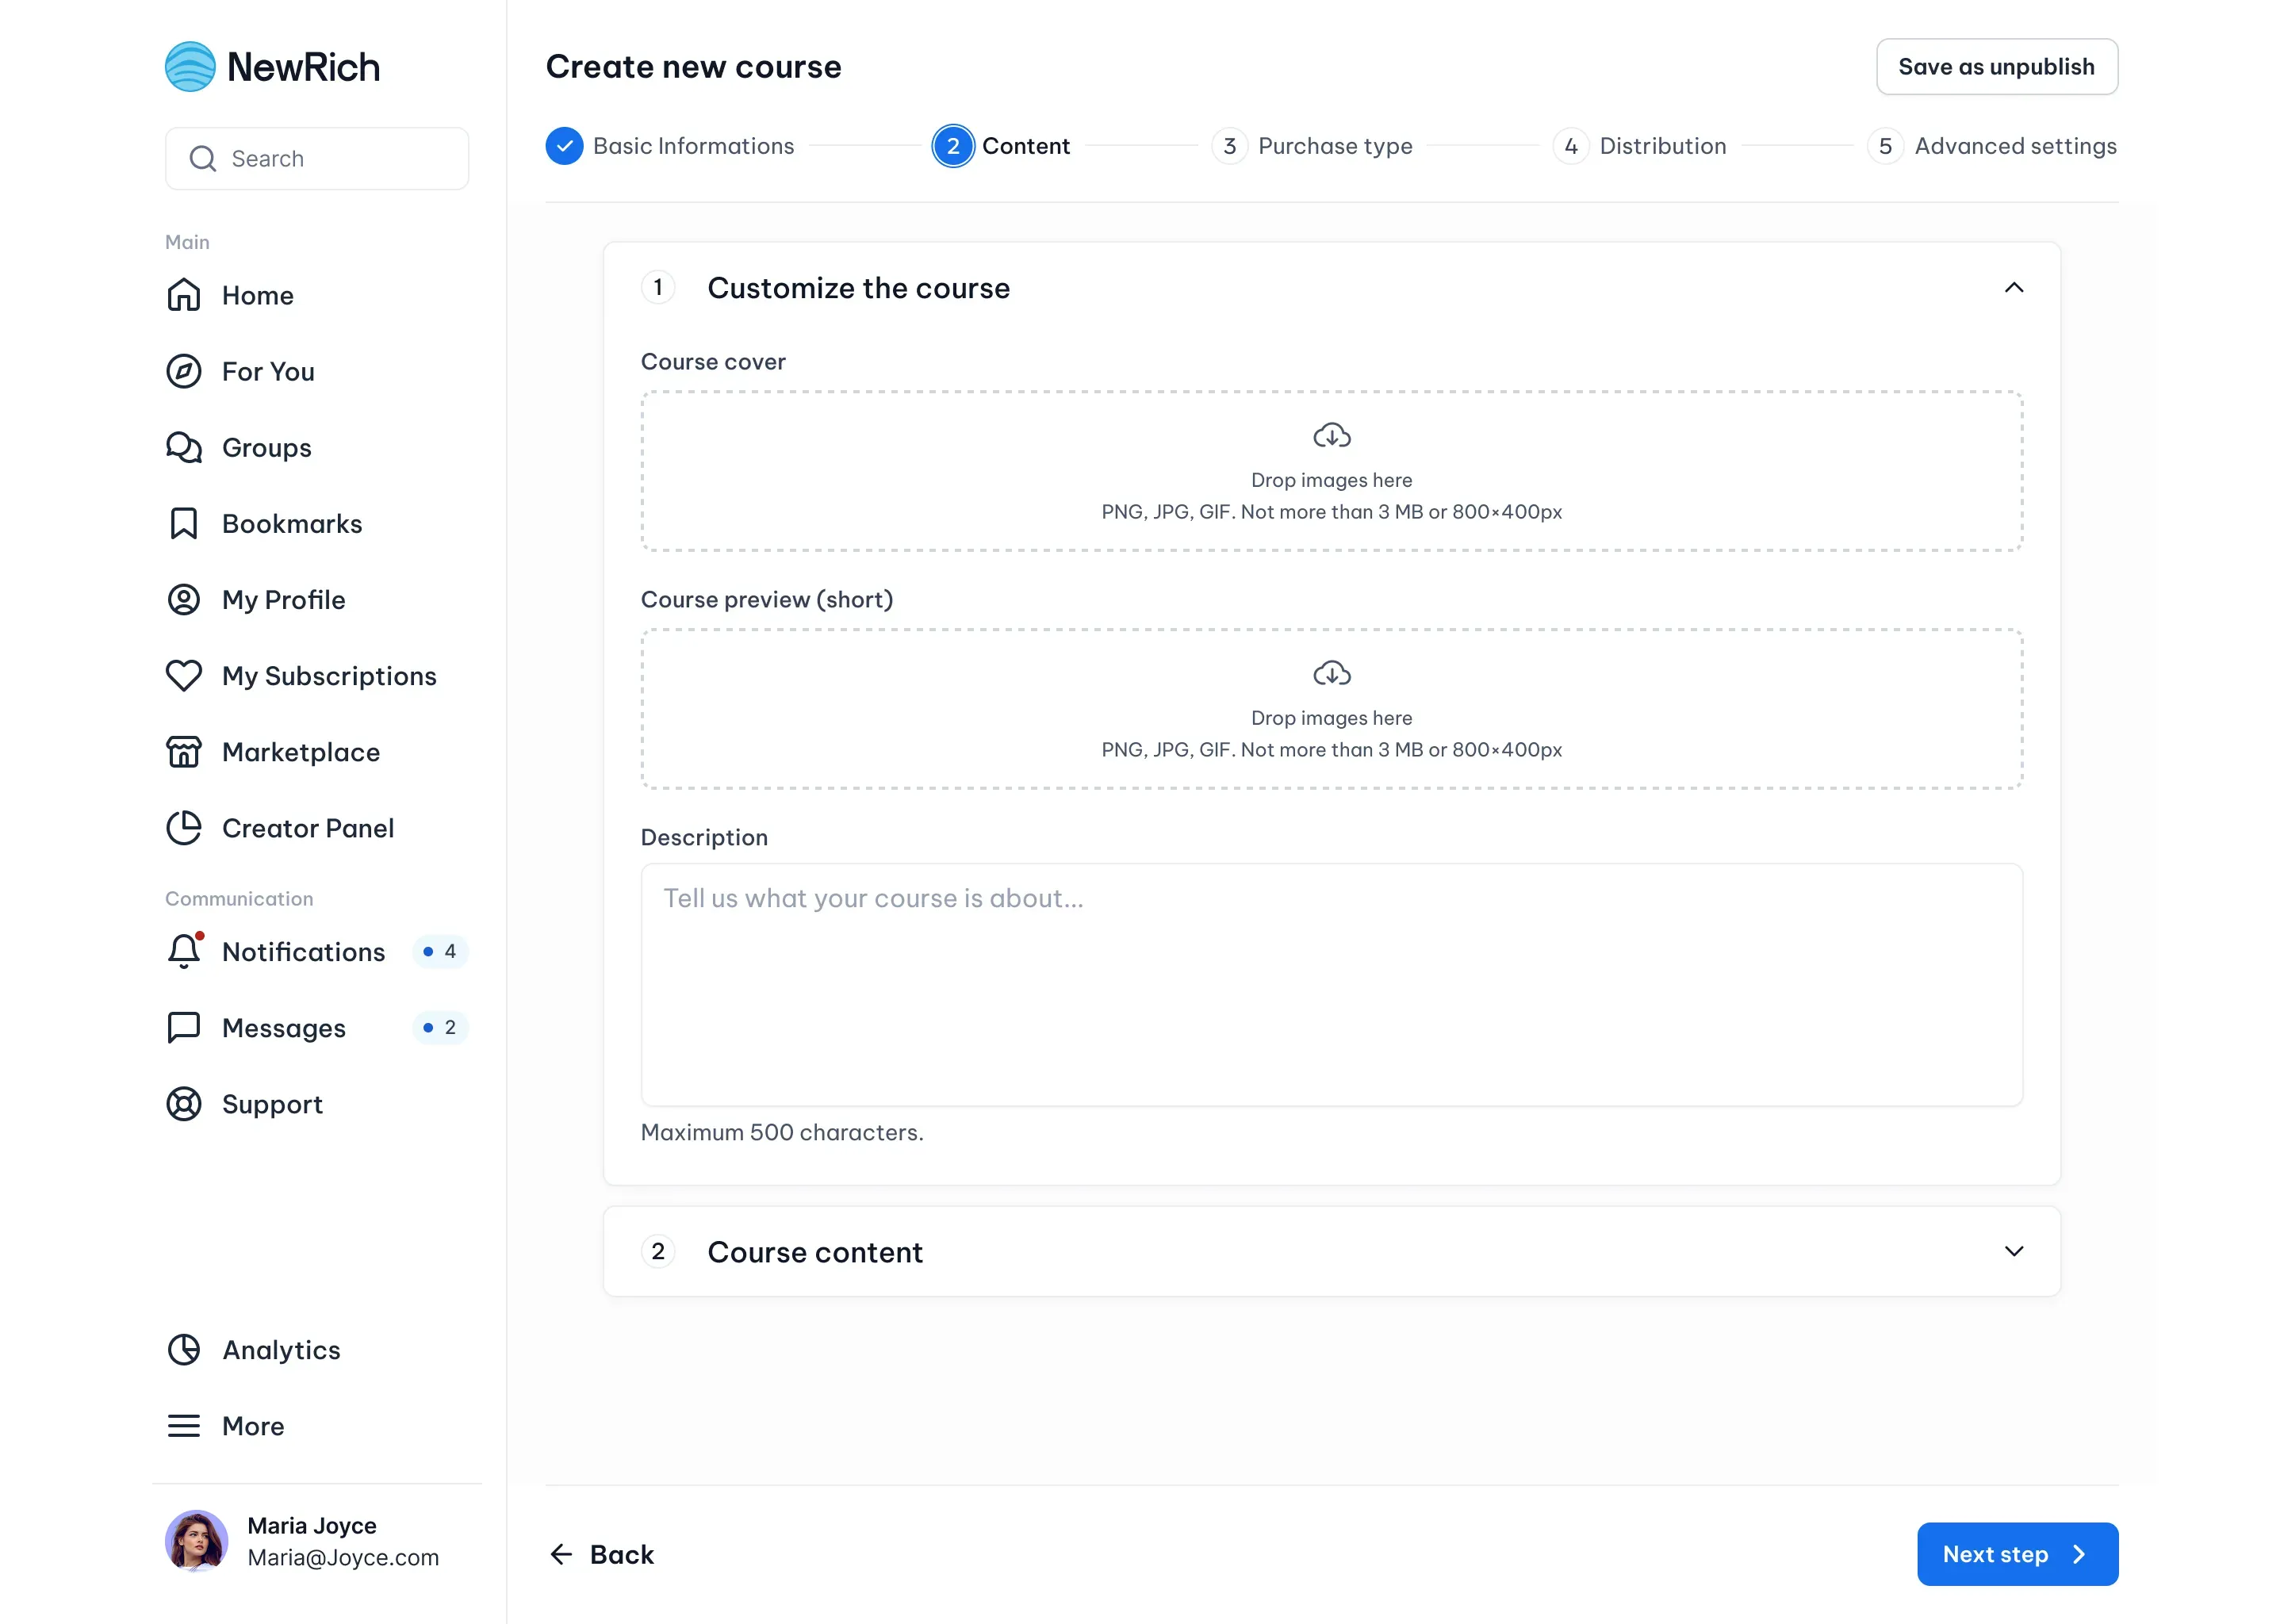
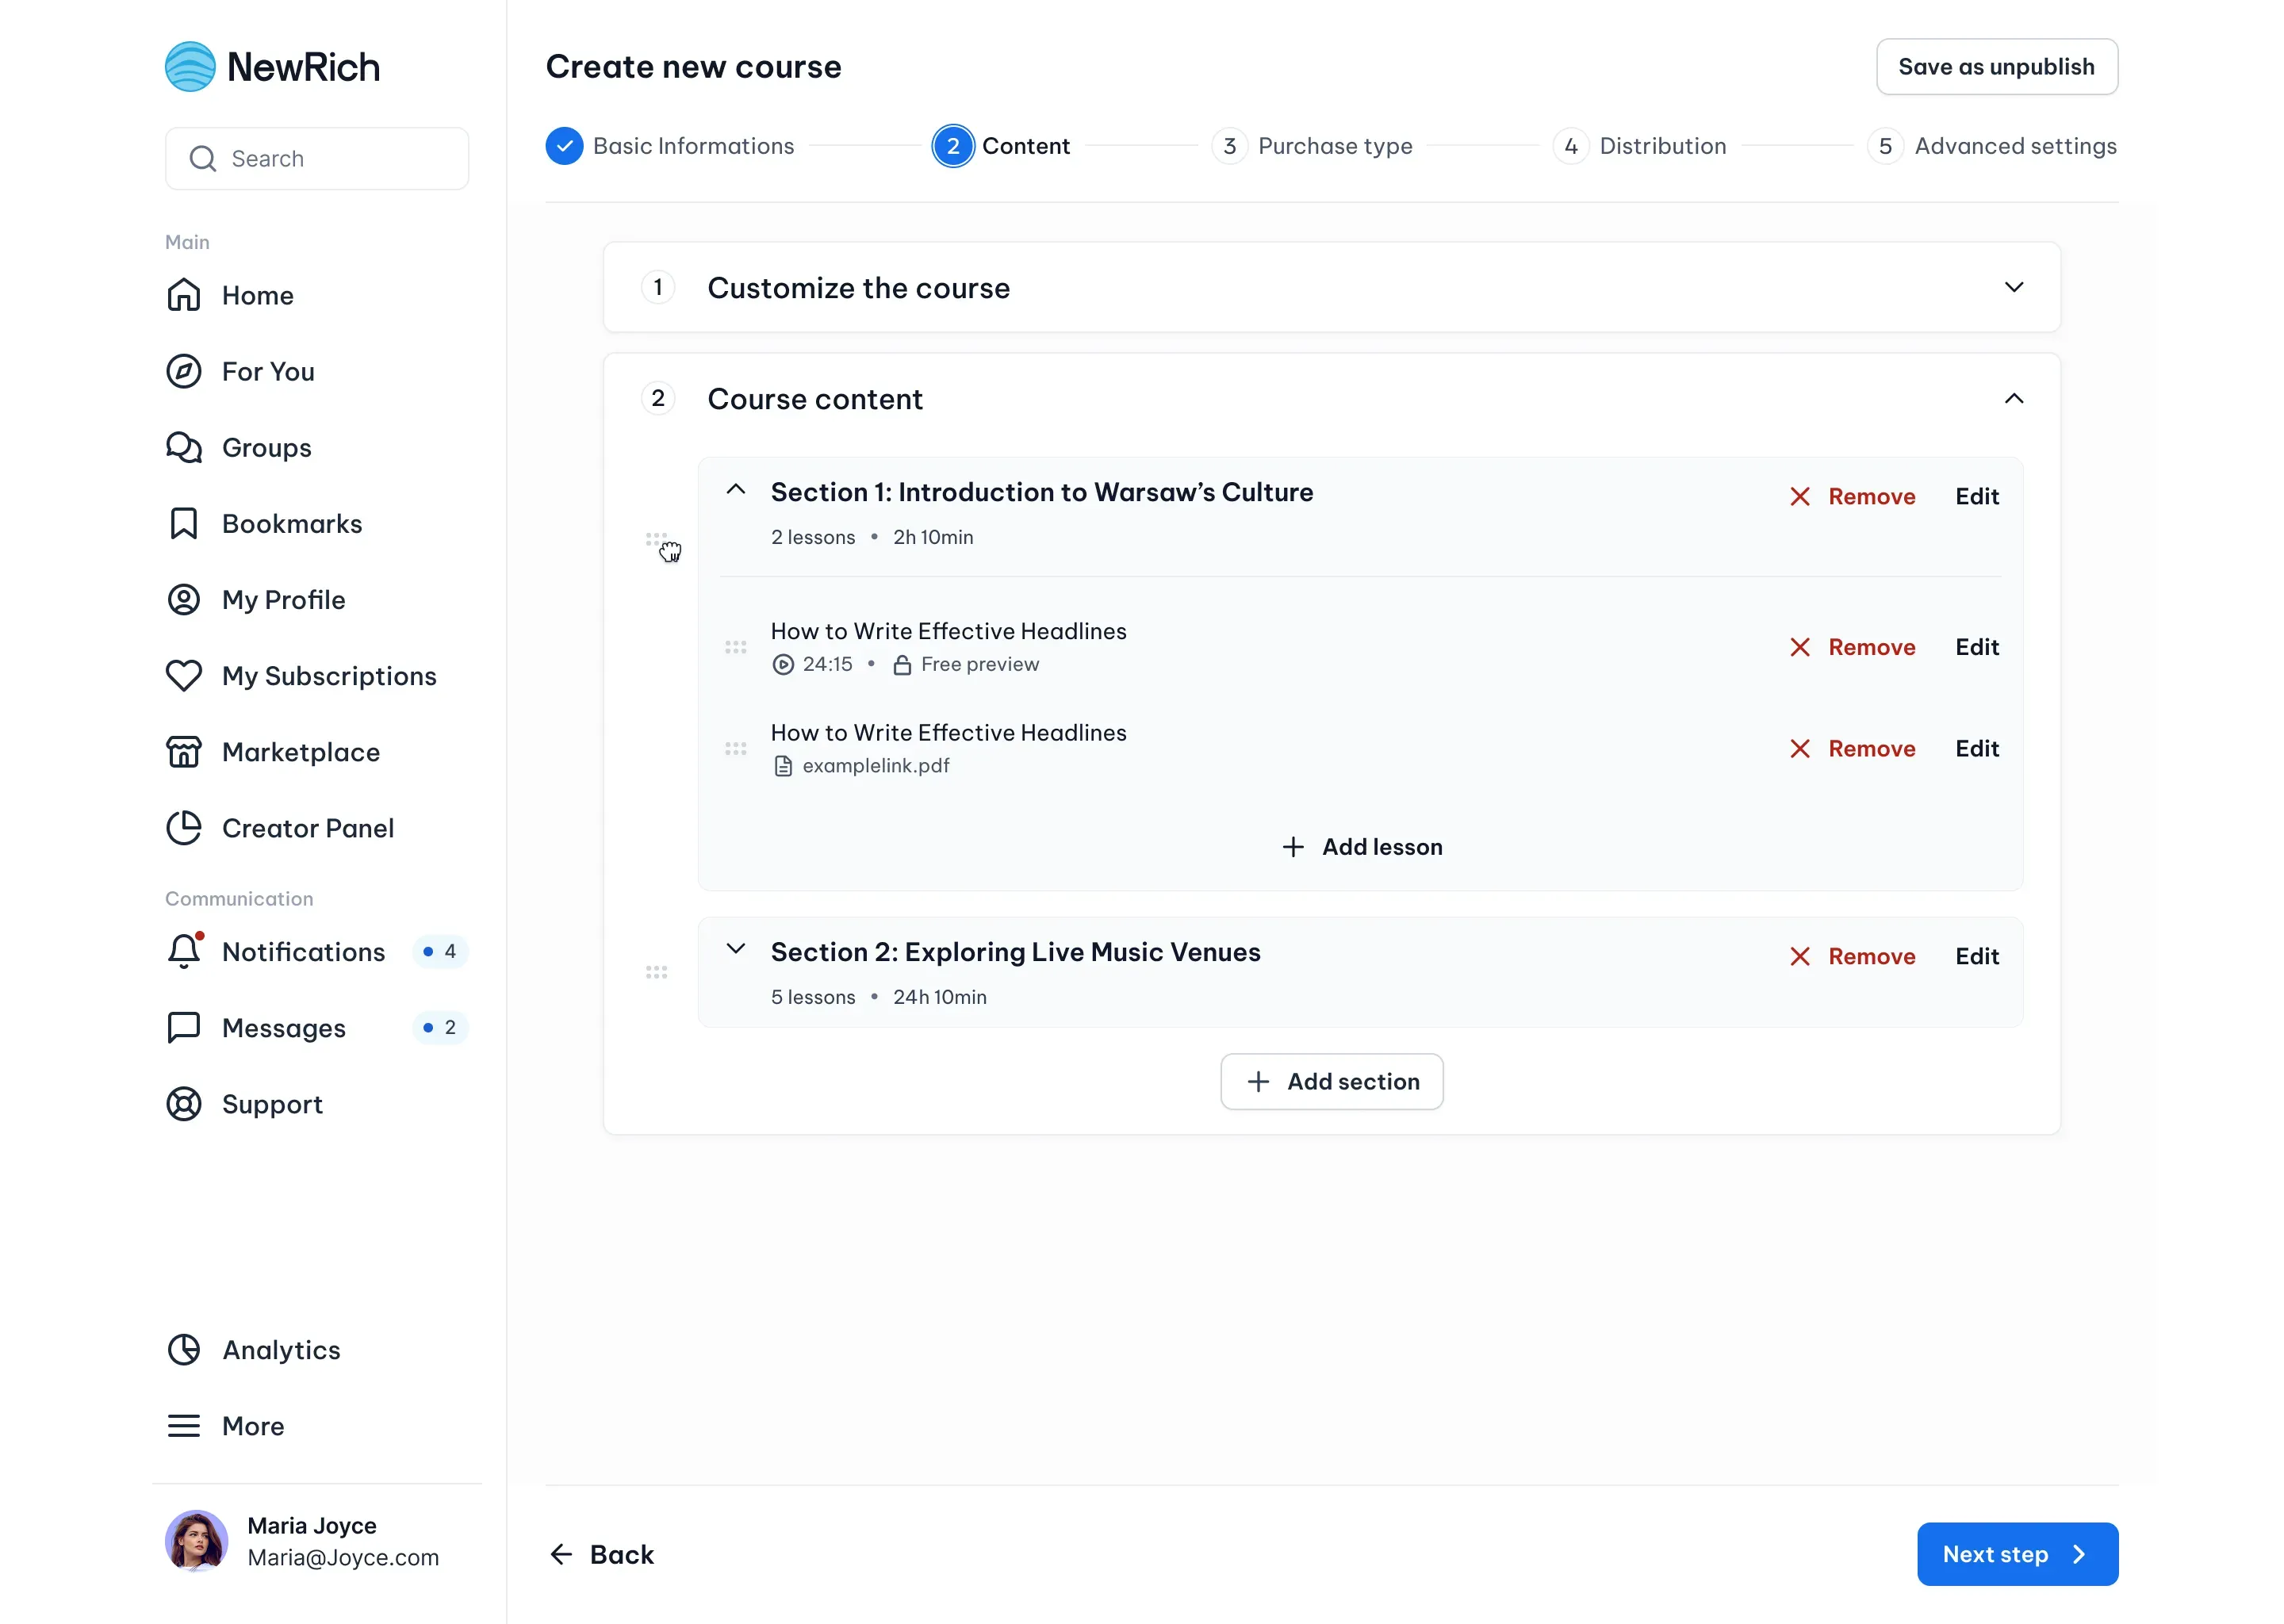
In this step, you'll build your course by adding branding, descriptions, sections, and lessons.
Start by customizing your course page. You can upload a course cover image and a preview image, then add a description that introduces your course to potential students. These elements appear on your Marketplace listing and course page.
Customize the Course
Complete the following information:
- Upload a course cover image.
- Upload a course preview image.
- Add a course description.
Build Your Course Structure
Once you've customized your course page, you can begin creating the course content.
Courses are organized into Sections. Each section represents a chapter or module of your course and may contain one or more Lessons. This structure helps learners navigate the course and follow the material in the intended order.
To build your course:
- Create one or more sections.
- Add lessons to each section.
- Upload learning materials for every lesson.
- Arrange sections and lessons in the desired order.
Lessons
Lessons contain the learning materials for your students.
For each lesson, provide:
- Lesson title
- Lesson description
- Lesson material
Supported lesson materials include videos, PDFs, images, and other supported learning resources.
Free Lesson Preview
You can optionally enable Free Preview for individual lessons.
When enabled, visitors can preview selected lessons before purchasing the course. This helps potential students explore your teaching style and course content before enrolling.
Organizing Your Content
As your course grows, you can manage its structure by:
- Editing lessons
- Removing lessons
- Reordering lessons
- Moving lessons between sections using drag and drop
When you've finished organizing your course content, click Next step.
Step 3 - Purchase Type
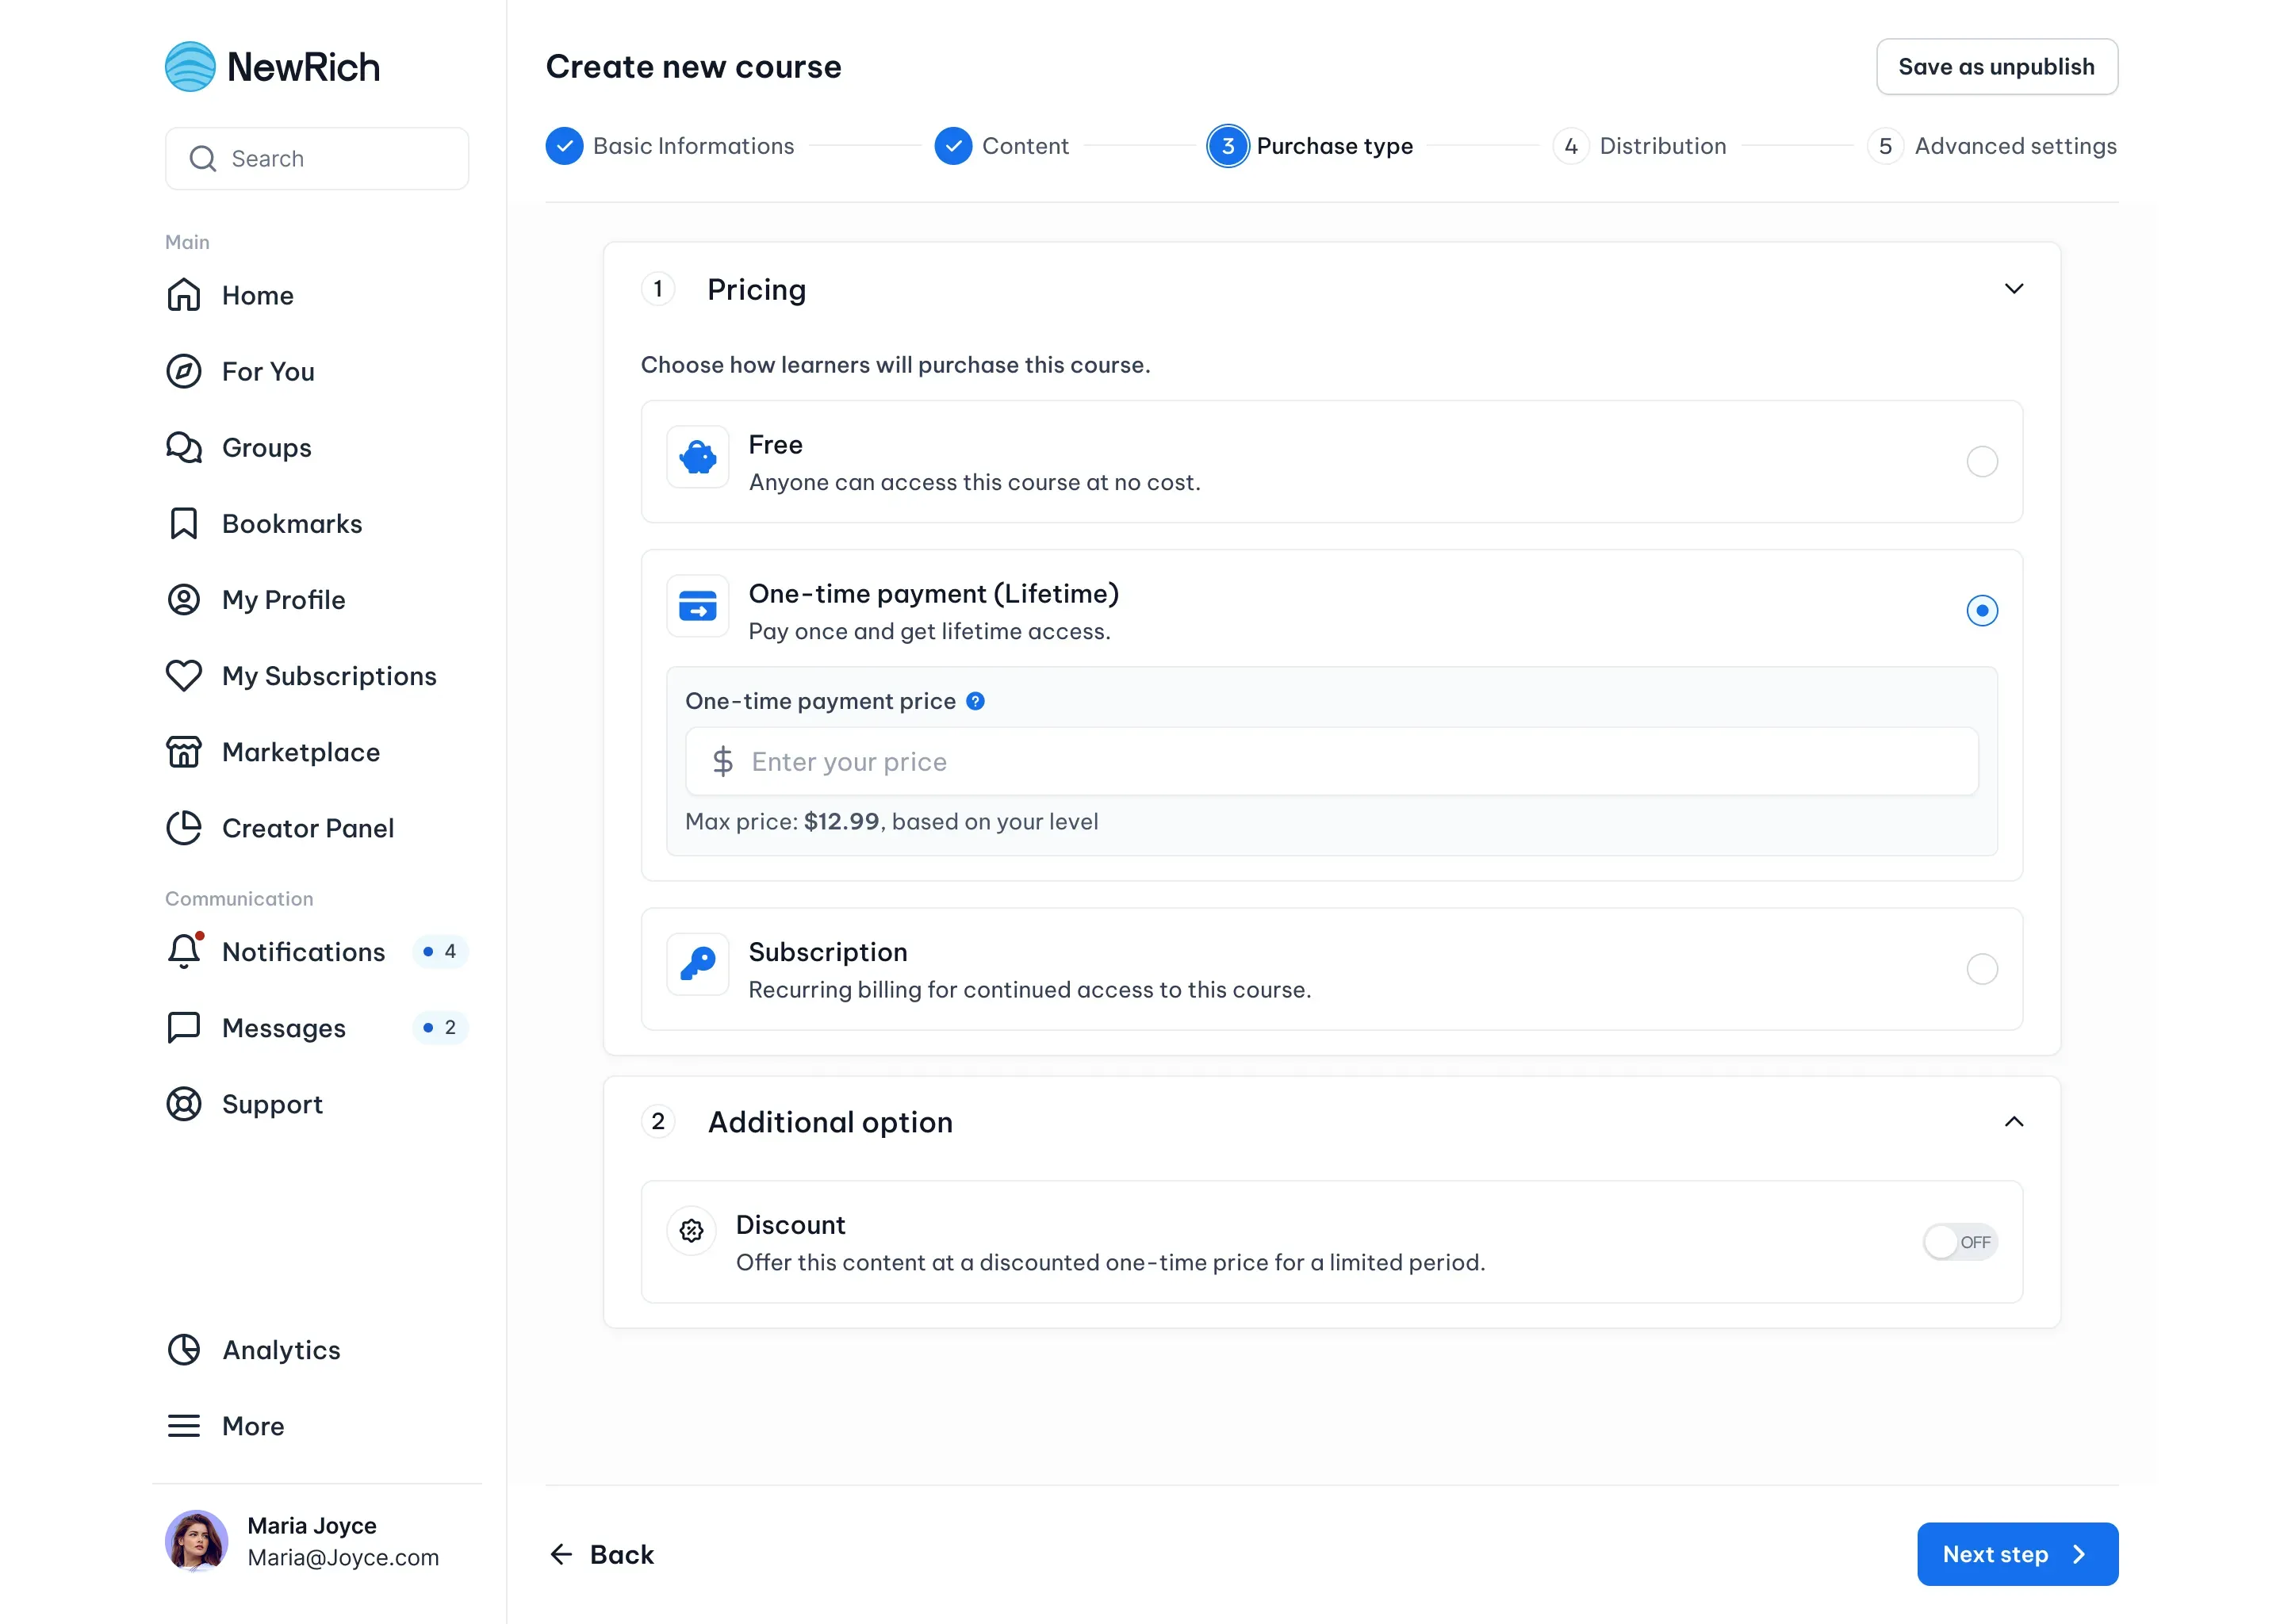
In this step, you'll decide how learners can access your course and configure its pricing.
Choose one of the available purchase options based on how you'd like to offer your course.
- Free - Choose Free to make your course available to everyone without requiring payment.
- No additional pricing configuration is required.
- One-time Purchase - Choose One-time Purchase if you'd like learners to purchase your course with a single payment and keep lifetime access.
- Enter the price for your course. The maximum price you can set depends on your current Creator Rank.
- Subscription - Choose Subscription to make your course available to learners with an active subscription.
- Select a billing frequency and set the subscription price. Available billing options include:
- Weekly
- Every 2 Weeks
- Monthly
- Quarterly
- Yearly
- Select a billing frequency and set the subscription price. Available billing options include:
Optional Discount
For courses available as a One-time Purchase, you can optionally offer a temporary discount.
Discounted pricing is displayed on your Marketplace listing and course page to help promote your course.
When you've finished configuring the purchase settings, click Next step.
Step 4 - Distribution
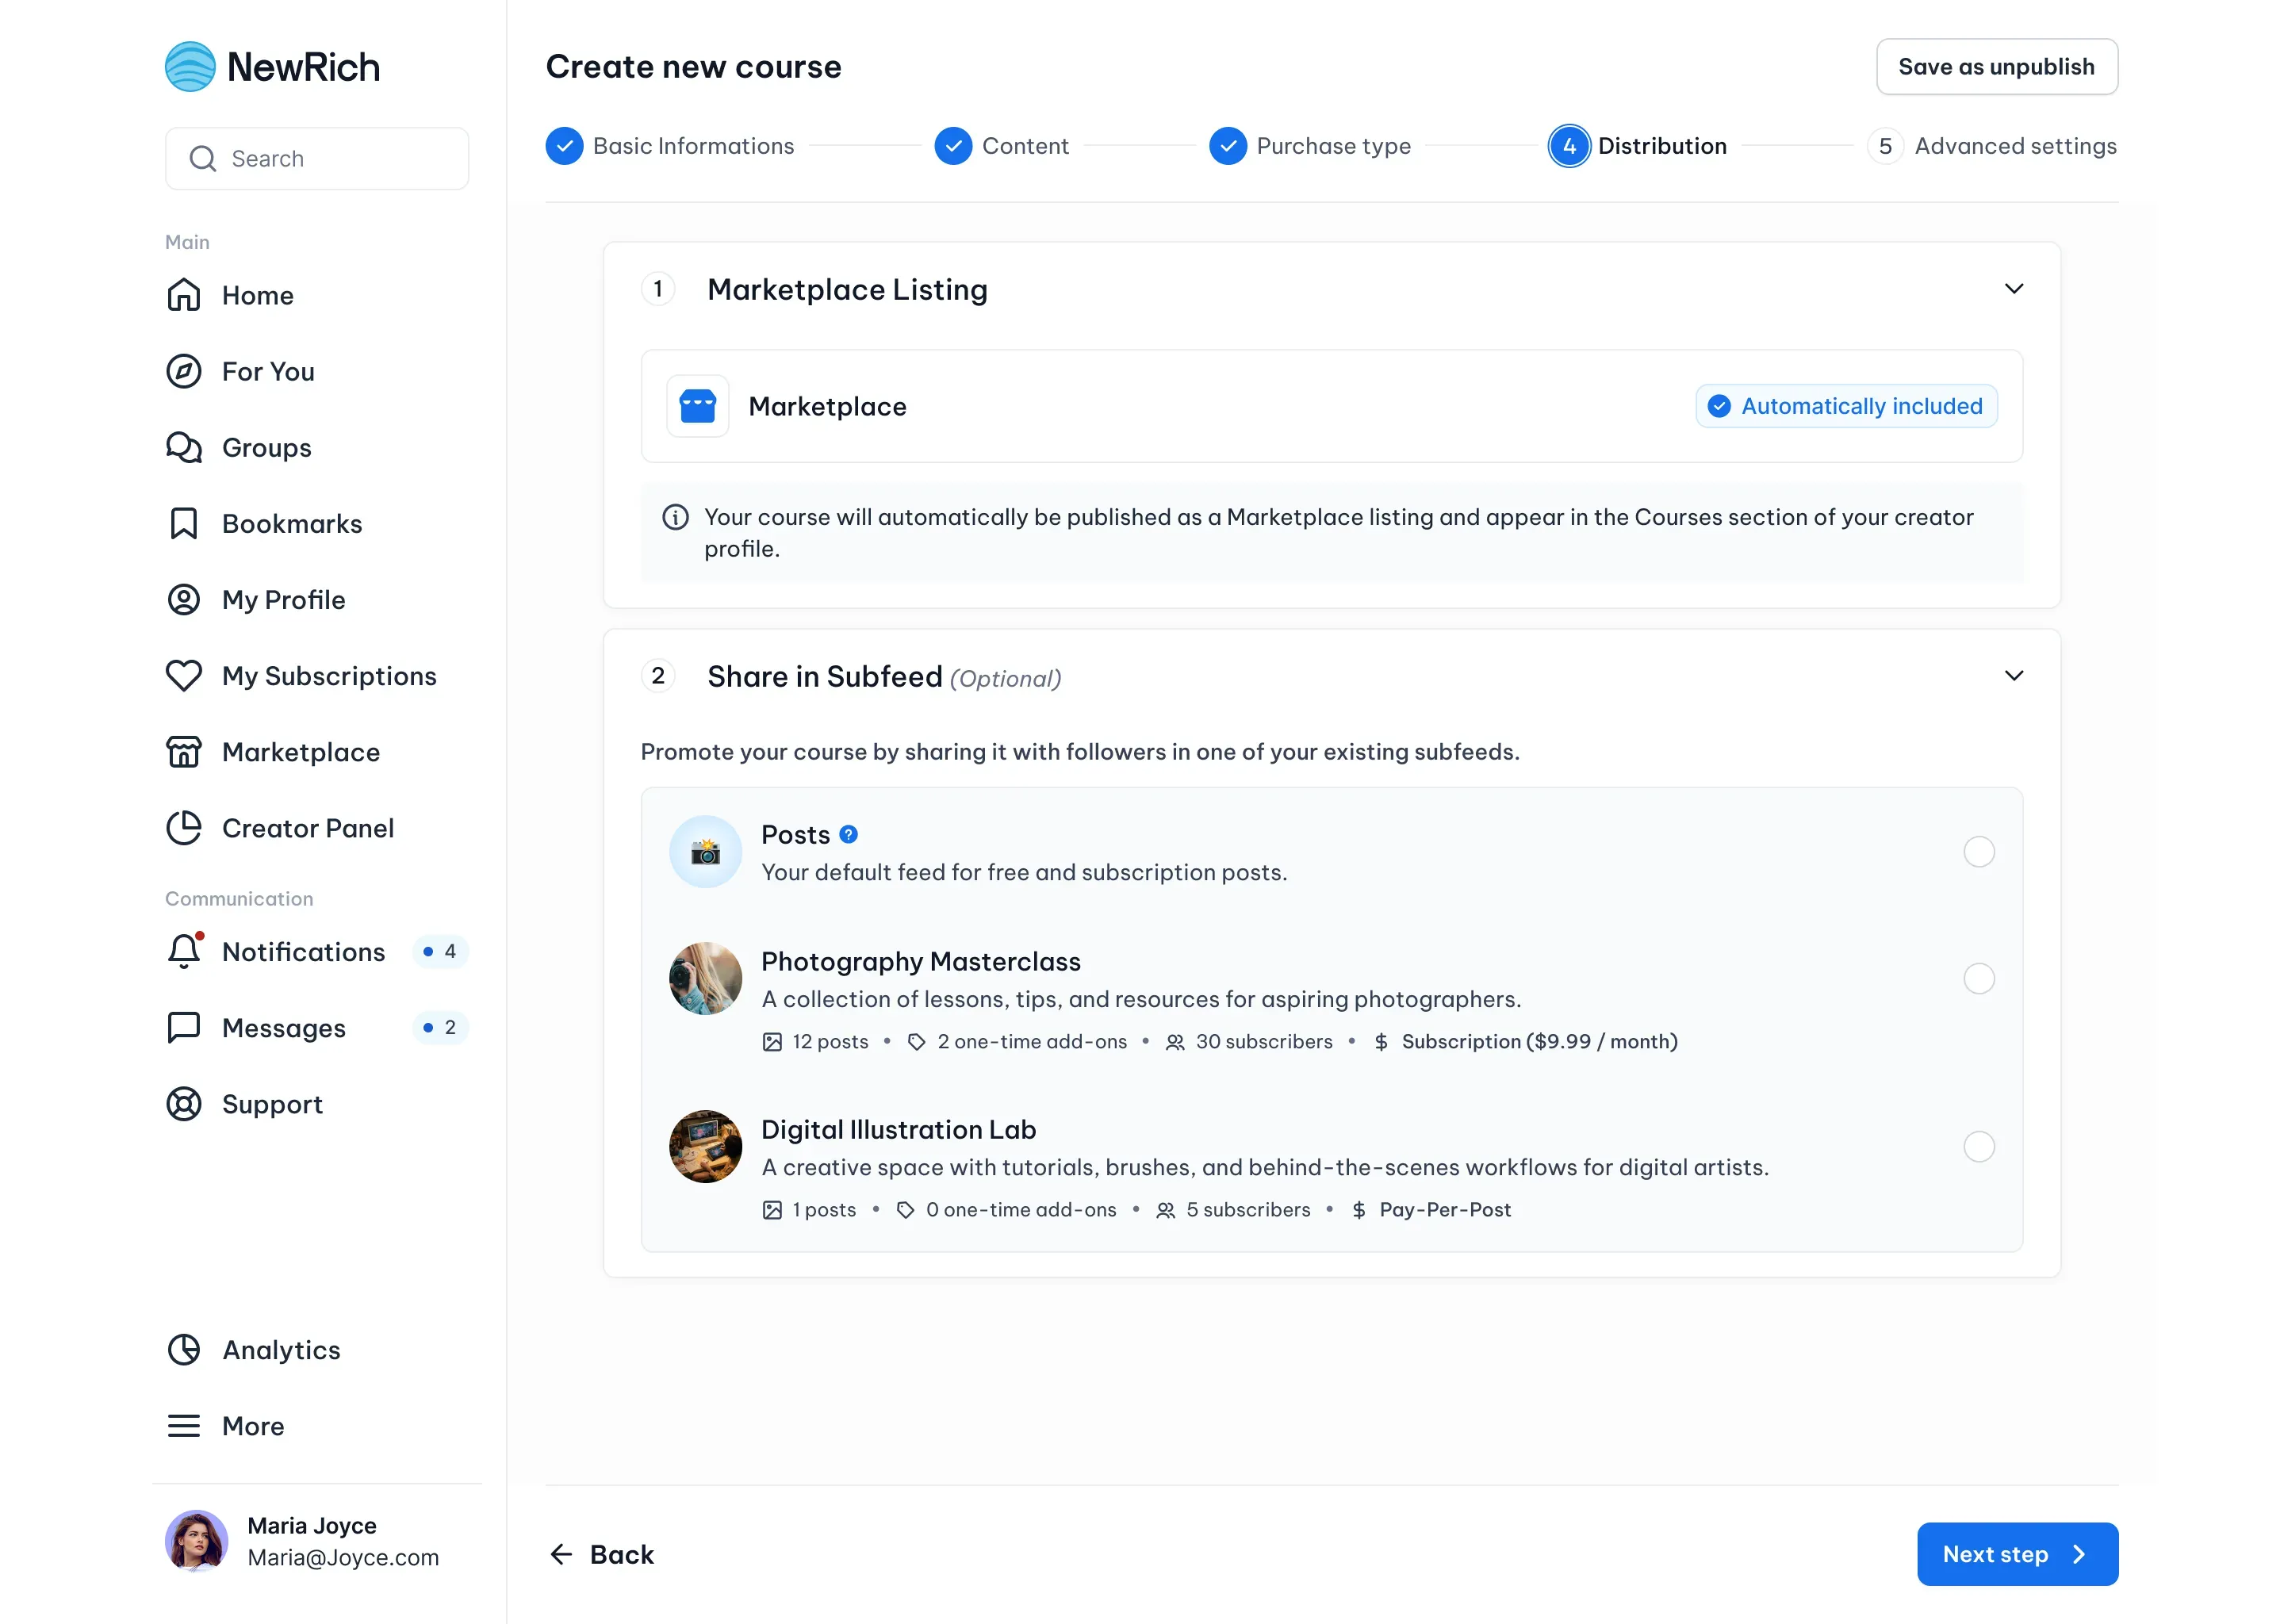
Choose where your course will be available after it's published.
Every course is automatically published to the Marketplace, making it available for learners to discover and purchase.
You can also promote your course by sharing it in one of your existing Subfeeds. This allows your followers or subscribers to discover the course directly from their content feed.
Distribution options
Your course can be:
- Published automatically to the Marketplace
- Shared in one or more Subfeeds to increase its visibility
Sharing a course in a Subfeed doesn't change its purchase settings—it simply makes it easier for your audience to discover it.
When you've finished configuring the distribution settings, click Next step.
Step 5 - Advanced Settings
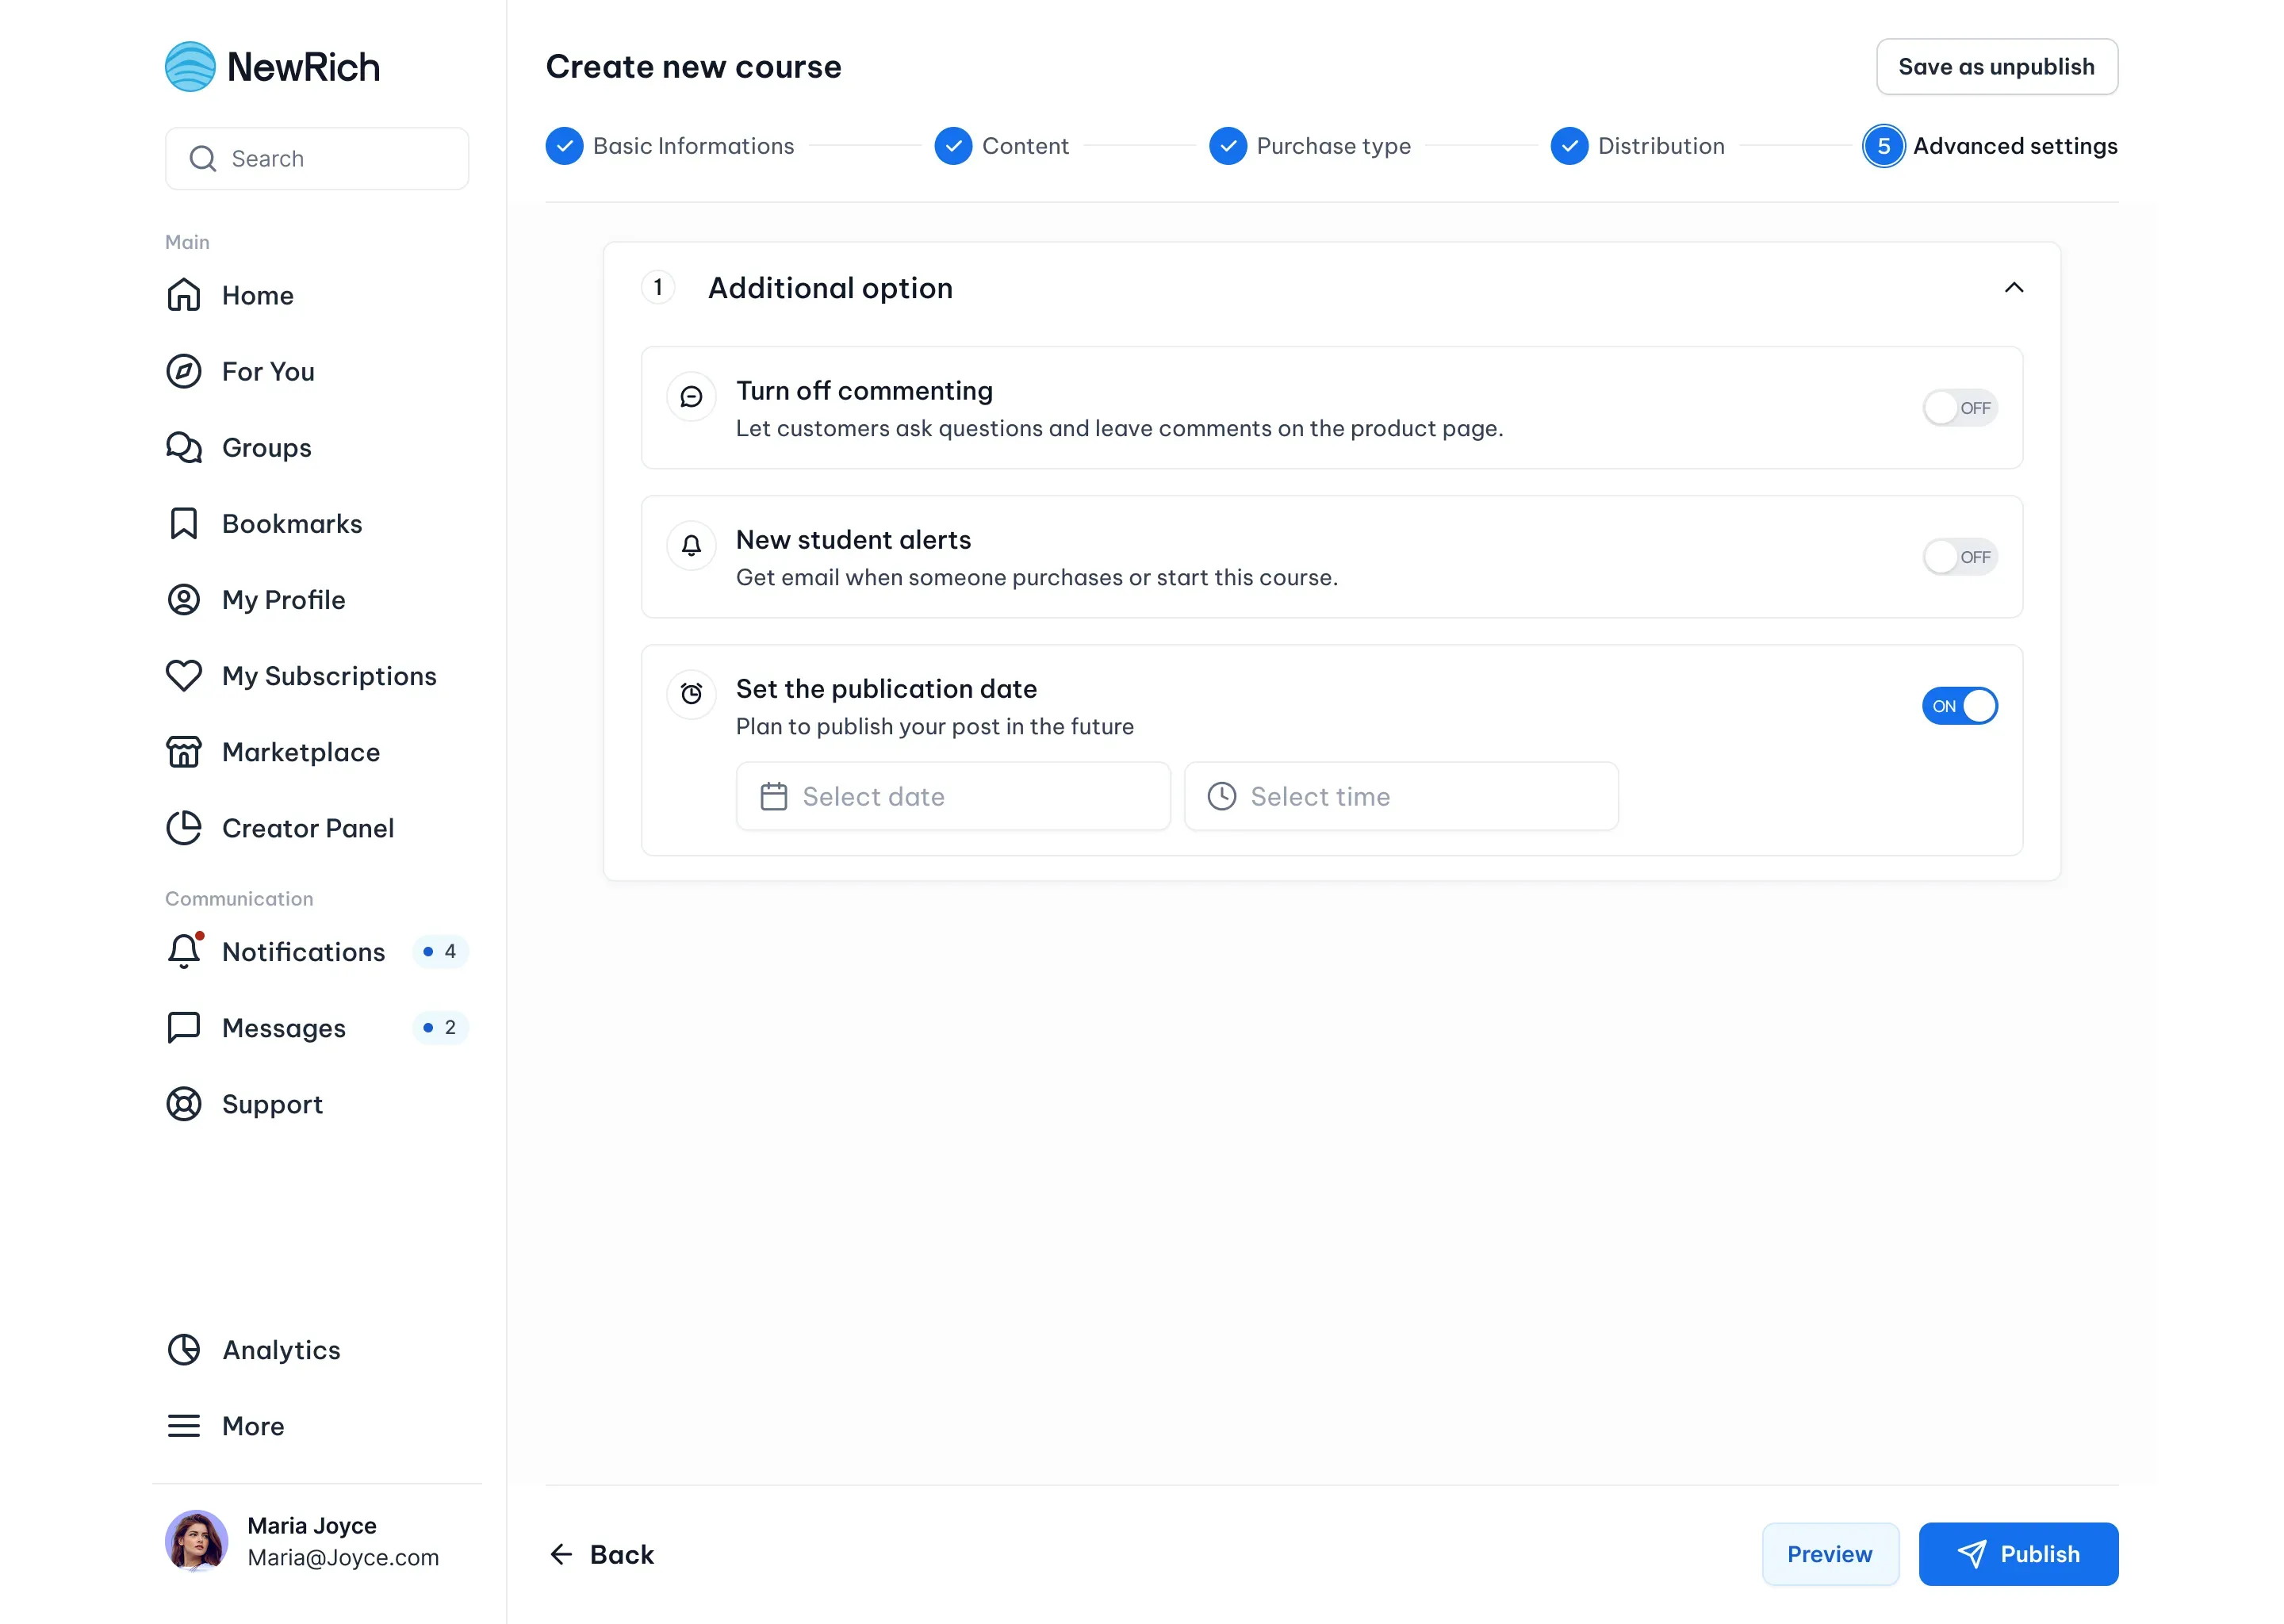
Before publishing your course, you can configure additional settings that control how learners interact with it.
Available options:
- Allow Comments - Choose whether learners can leave comments and questions on your course page.
- Enrollment Notifications - Receive an email notification whenever a new student enrolls in your course.
- Schedule Publication - Choose a future date and time to publish your course automatically.
These settings help you manage learner engagement and control when your course becomes available.
When you're ready:
- Review your course using Preview.
- Click Publish to make your course available.
Course Published
Once your course has been successfully published, it becomes available to learners based on the purchase and distribution settings you've configured.
A confirmation message will appear, allowing you to:
- Return to your dashboard.
- Open and review your published course.
- Start sharing your course with your audience.
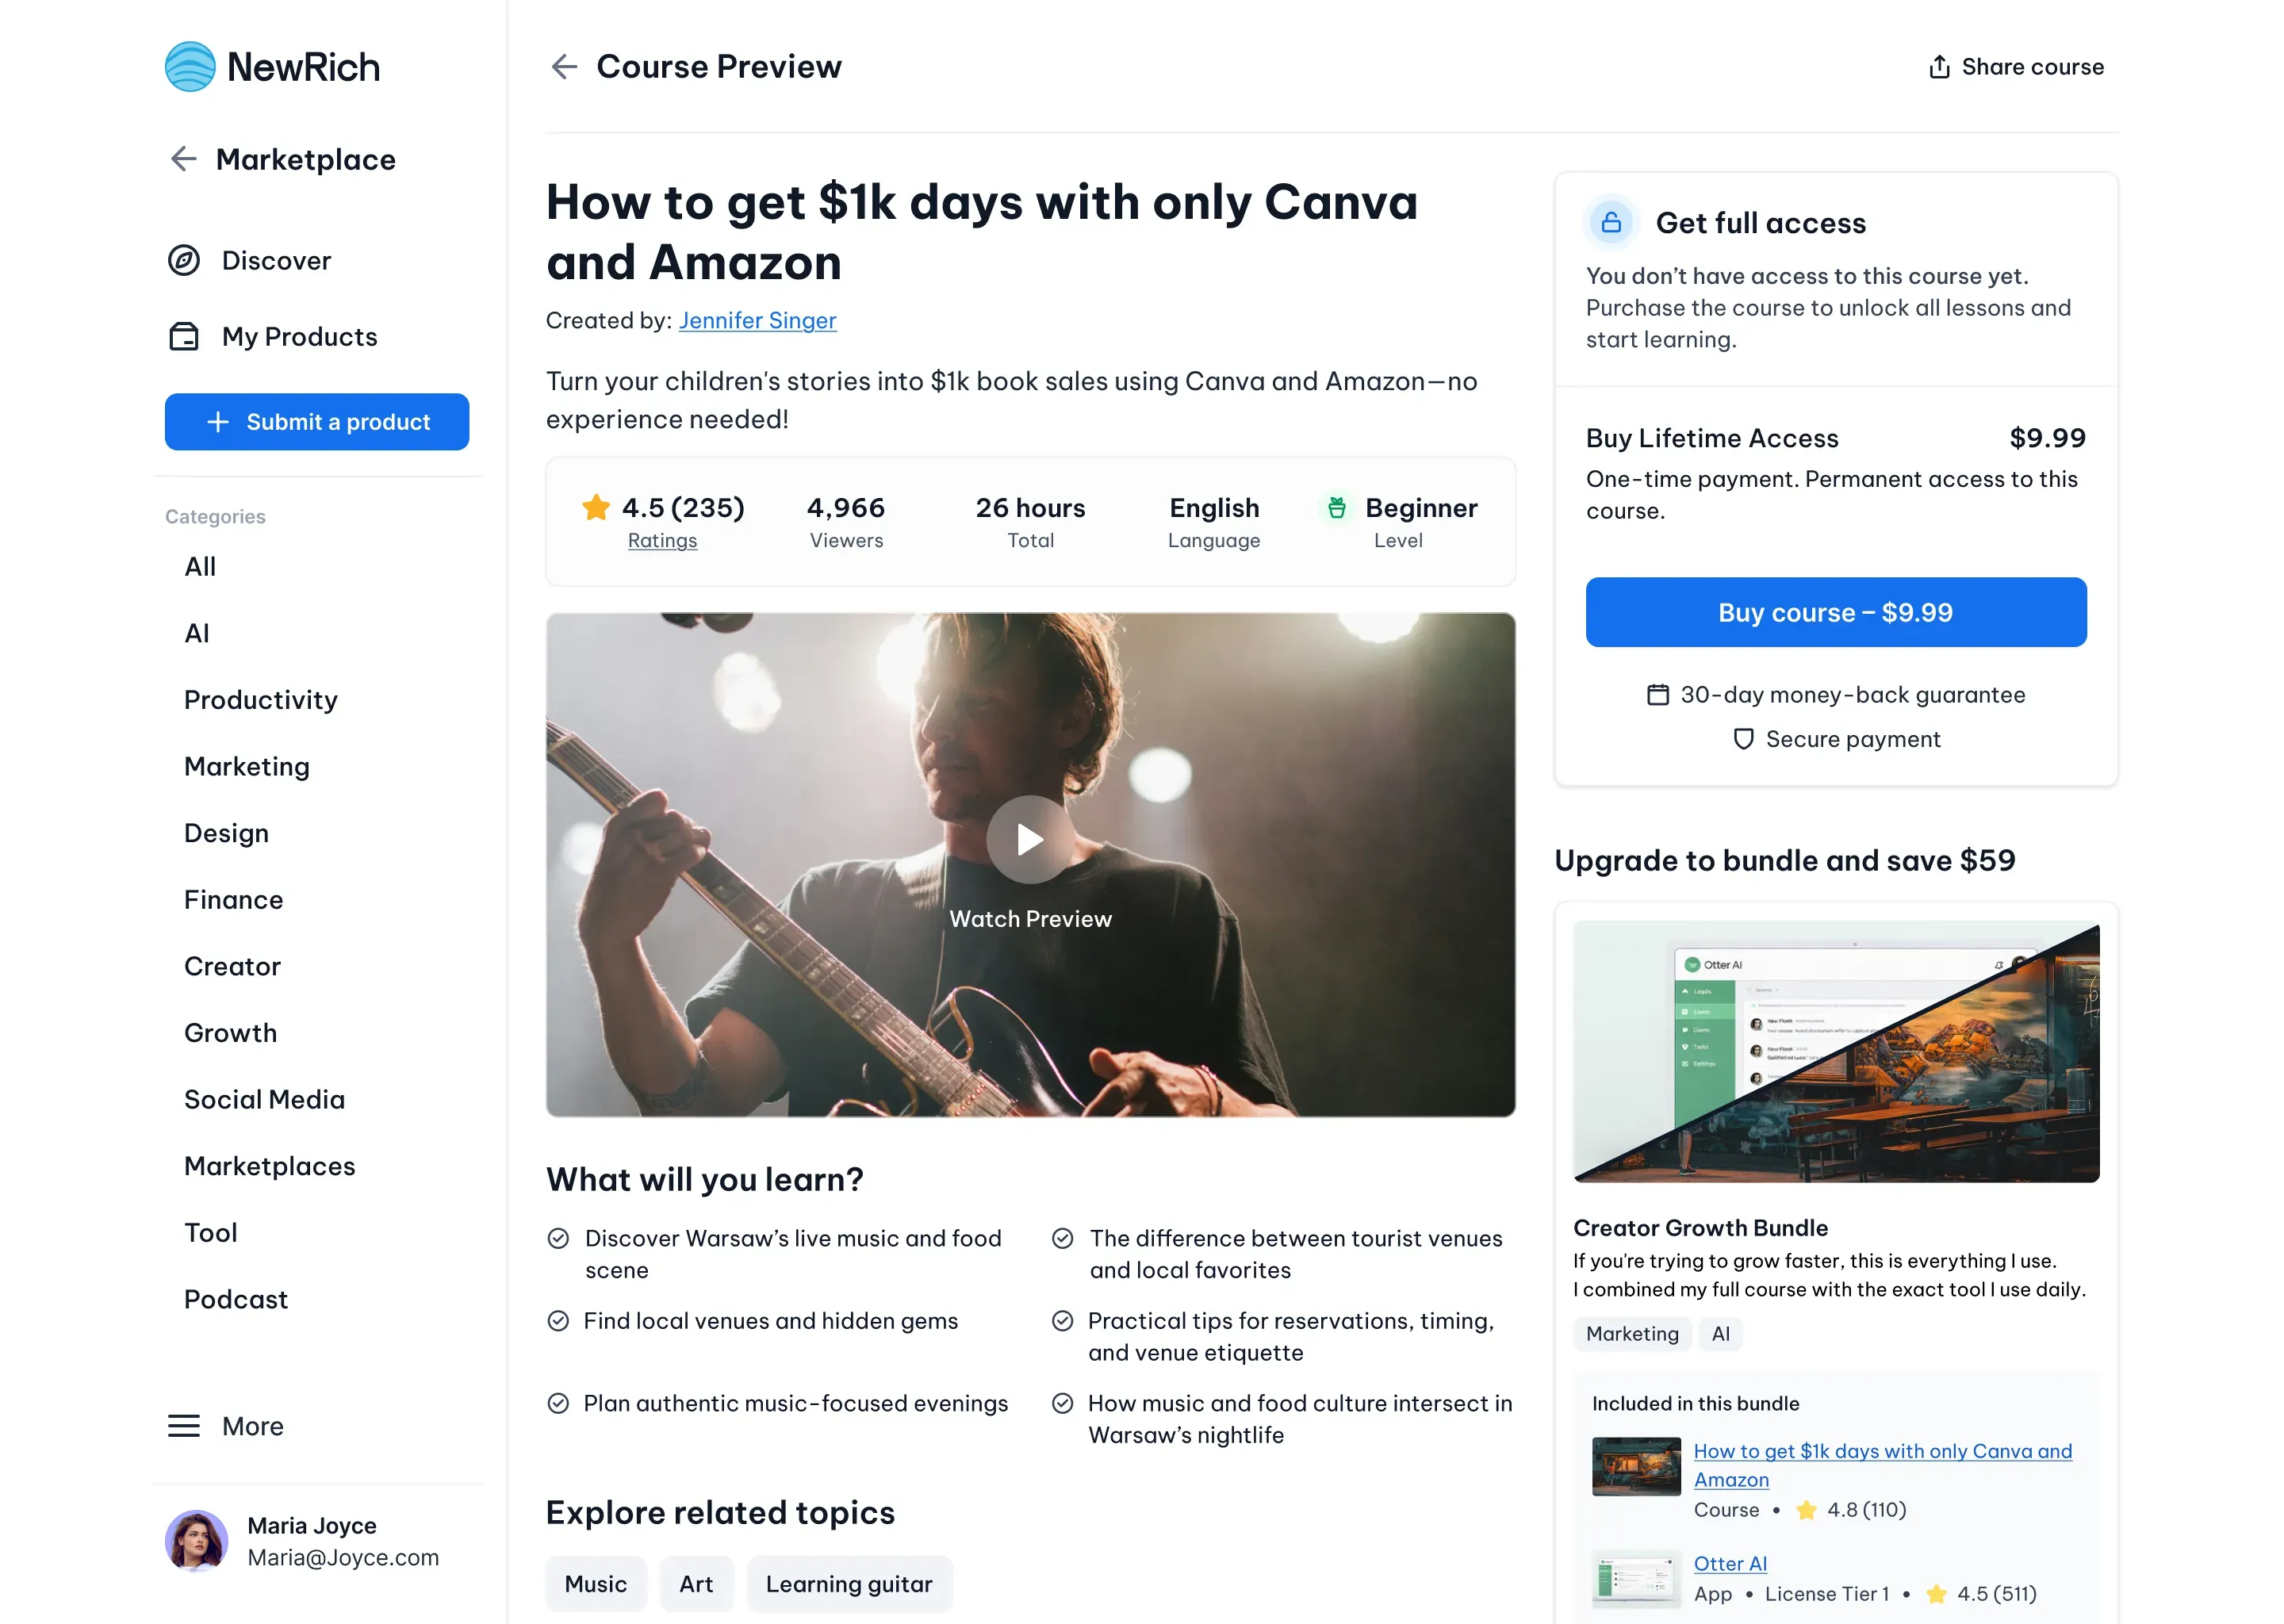
Course Page
After publishing, your course receives its own dedicated course page in the Marketplace.
The course page includes:
- Course overview
- Course objectives
- Course preview
- Curriculum with sections and lessons
- Instructor profile
- Student reviews and ratings
- Purchase options
- Bundle offers (when available)
If you've enabled Free Preview for selected lessons, visitors can preview those lessons before purchasing the course.
You can update your course content, pricing, curriculum, and publishing settings at any time from your Creator Panel.